How to Contribute
ACCESS-Hive Docs is a resource for the ACCESS community. We welcome all kinds of contributions! Whether you're fixing a typo, improving existing content, or adding new content - your input helps make the documentation more useful for the community.
Tip
Not comfortable editing documentation? Simply reporting a typo or suggesting an improvement by opening an issue is a valuable and appreciated contribution!
How you can contribute
There are three ways to contribute:
- Suggest a change or report a problem by opening a GitHub issue.
- Edit a page directly - quick fixes to a single page.
- Larger changes - new pages, restructuring, or multi-file edits.
All are equally welcome - feel free to choose whichever works best for you.
Info
All contribution paths require a GitHub account — sign up for free if you don't have one.
Open a GitHub Issue

The easiest way to contribute is to open a GitHub issue. This is a great option if you:
- Spot a typo, error, or broken link.
- Find something confusing or unclear.
- Have an idea for improvement.
- Don't want to edit the page yourself.
Once you have submitted the issue, you are welcome (and encouraged!) to address it (see edit a page or make changes locally options below), otherwise the ACCESS-NRI team will be happy to handle it.
Edit a page directly
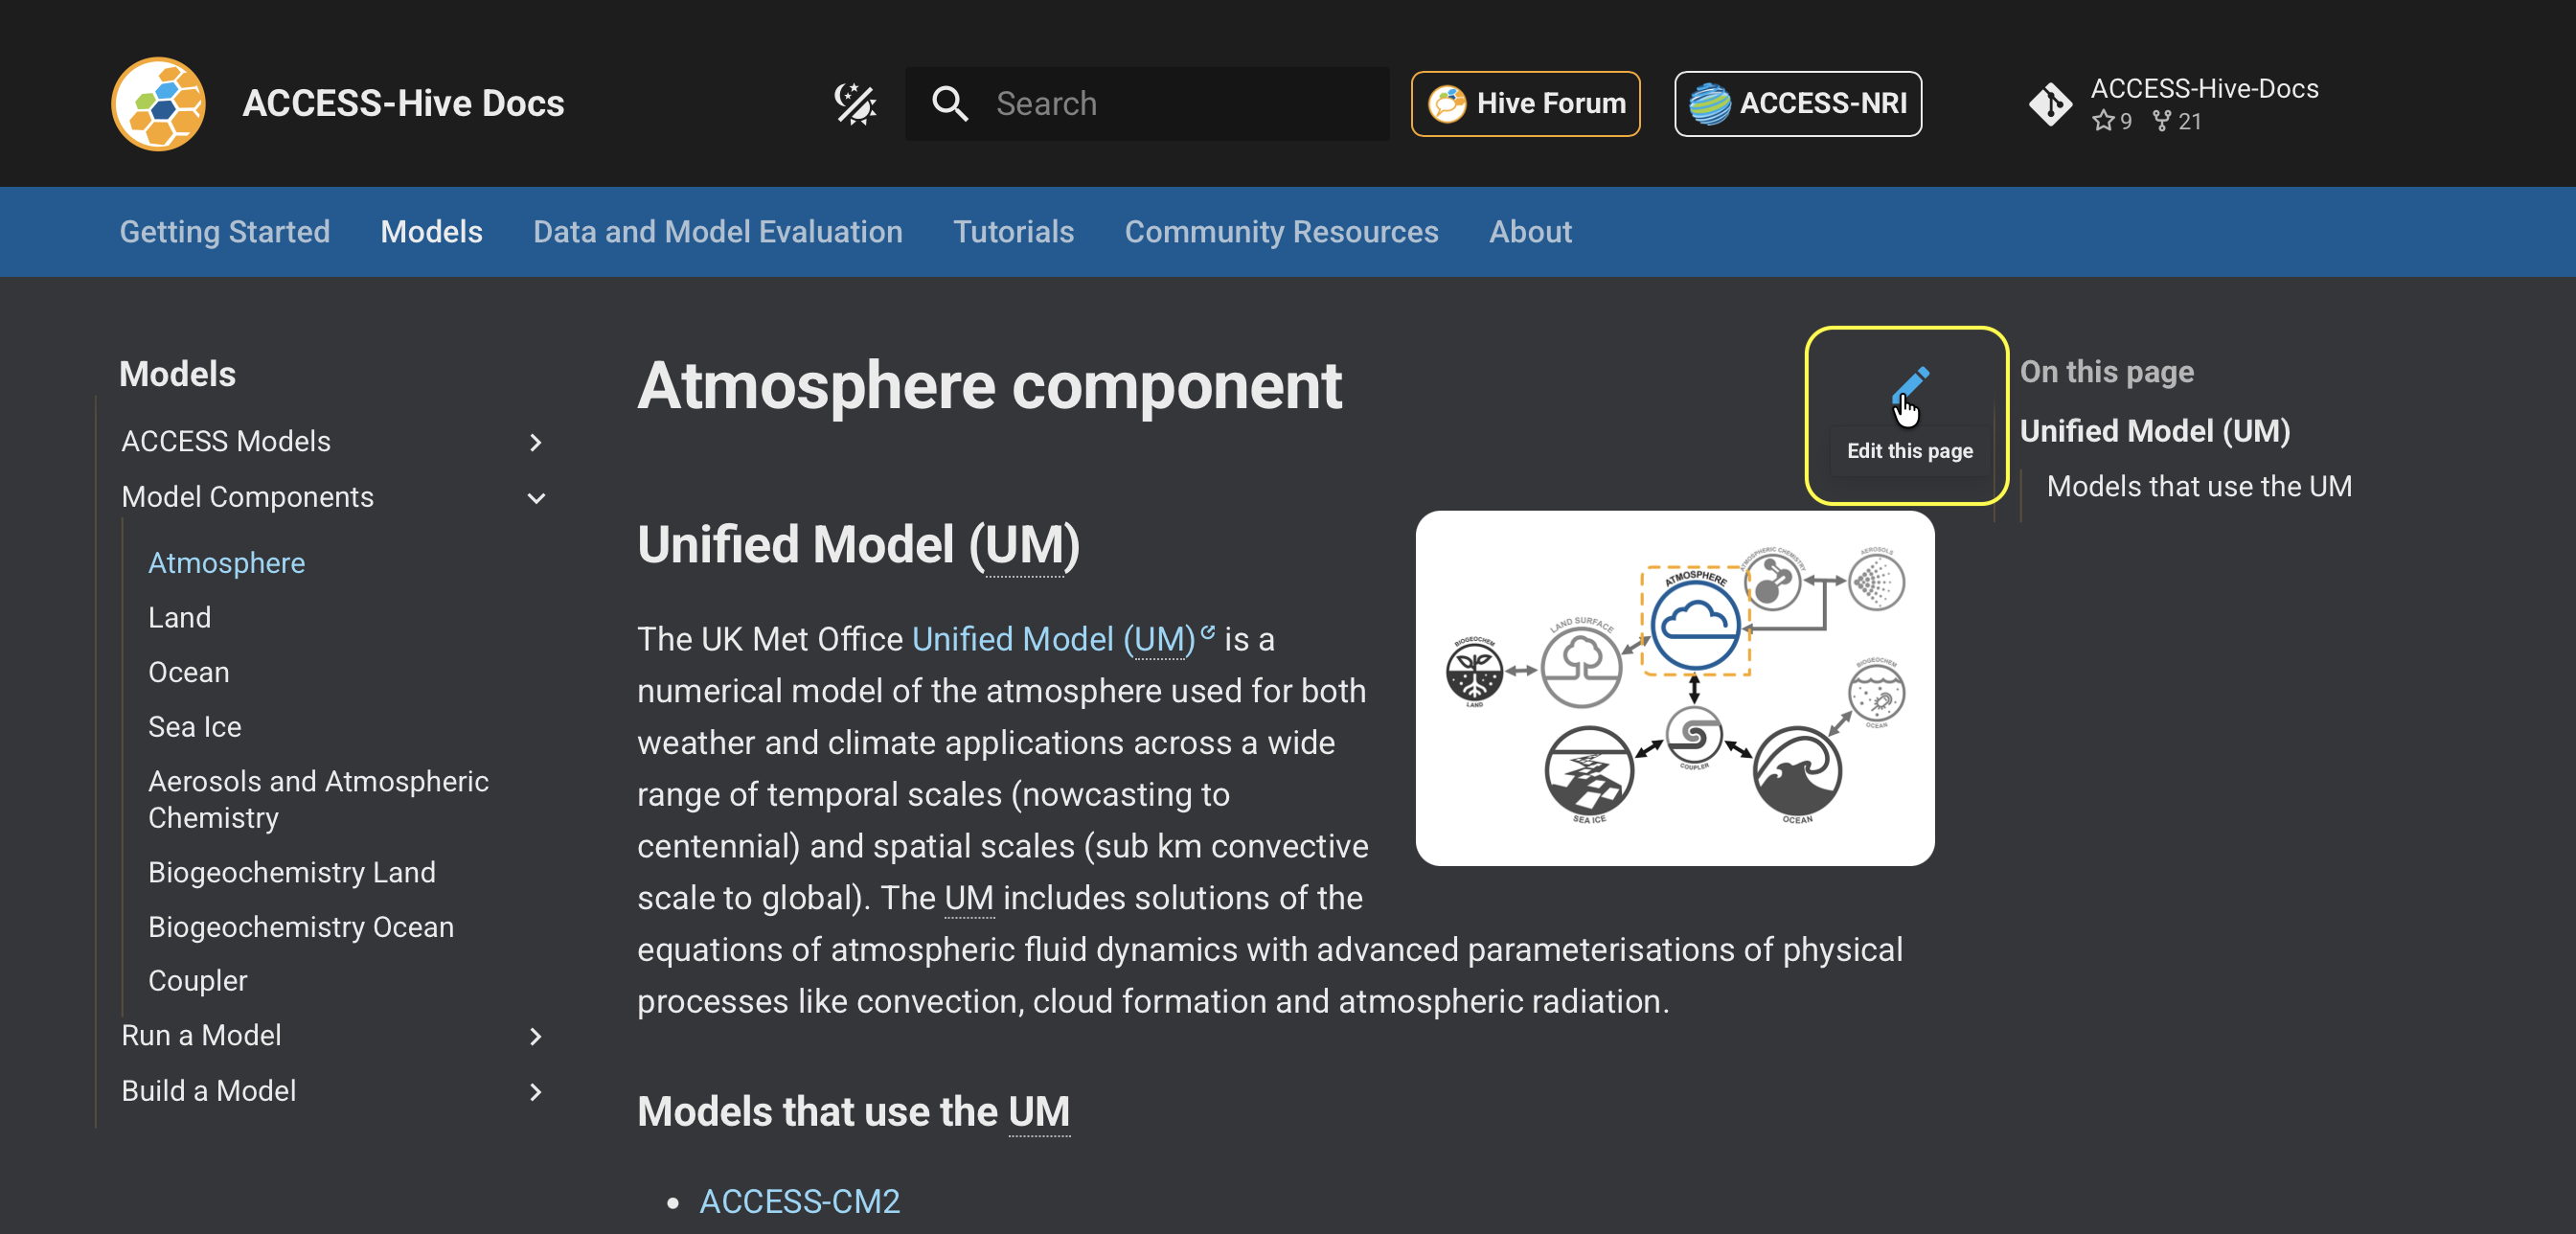
For quick fixes to an existing page (e.g., typos, wording update, broken links), you can edit a page directly in your browser using the pencil icon in the top-right corner of the website.
-
Click the pencil icon ( ) in the top-right corner of the page you want to edit.
-
Click Fork this repository.
Tip
If you have write access to the ACCESS-Hive-Docs repository, this step will not be required.
-
Make your changes in the editor.
- When you are satisfied with your changes, click on the Commit changes... button (at the top-right corner), add a Commit message and an optional Extended description, and click Propose changes. GitHub will automatically create a new branch (usually called
patch-1by default) and prompt you a screen where you can compare the changes. - Click Create pull request.
- Add a title and details about the proposed changes and click Create pull request.
Make changes locally
For adding new pages, restructuring content, or making larger multi-line updates, it's usually easiest to work on a local copy of the documentation and then push changes to GitHub when they're ready.
The steps below walk through a common GitHub workflow using Git and Git commands. For reference, the documentation is written in Markdown and built with Material for MkDocs, which is built on top of MkDocs.
Step 1: Fork the repository
Info
If you have write access to the ACCESS-Hive-Docs repository, you can skip this step.
A GitHub fork is your own copy of the repository on GitHub where you can make changes without affecting the original (upstream) repository. These changes can then be merged back into the upstream repository via pull requests.
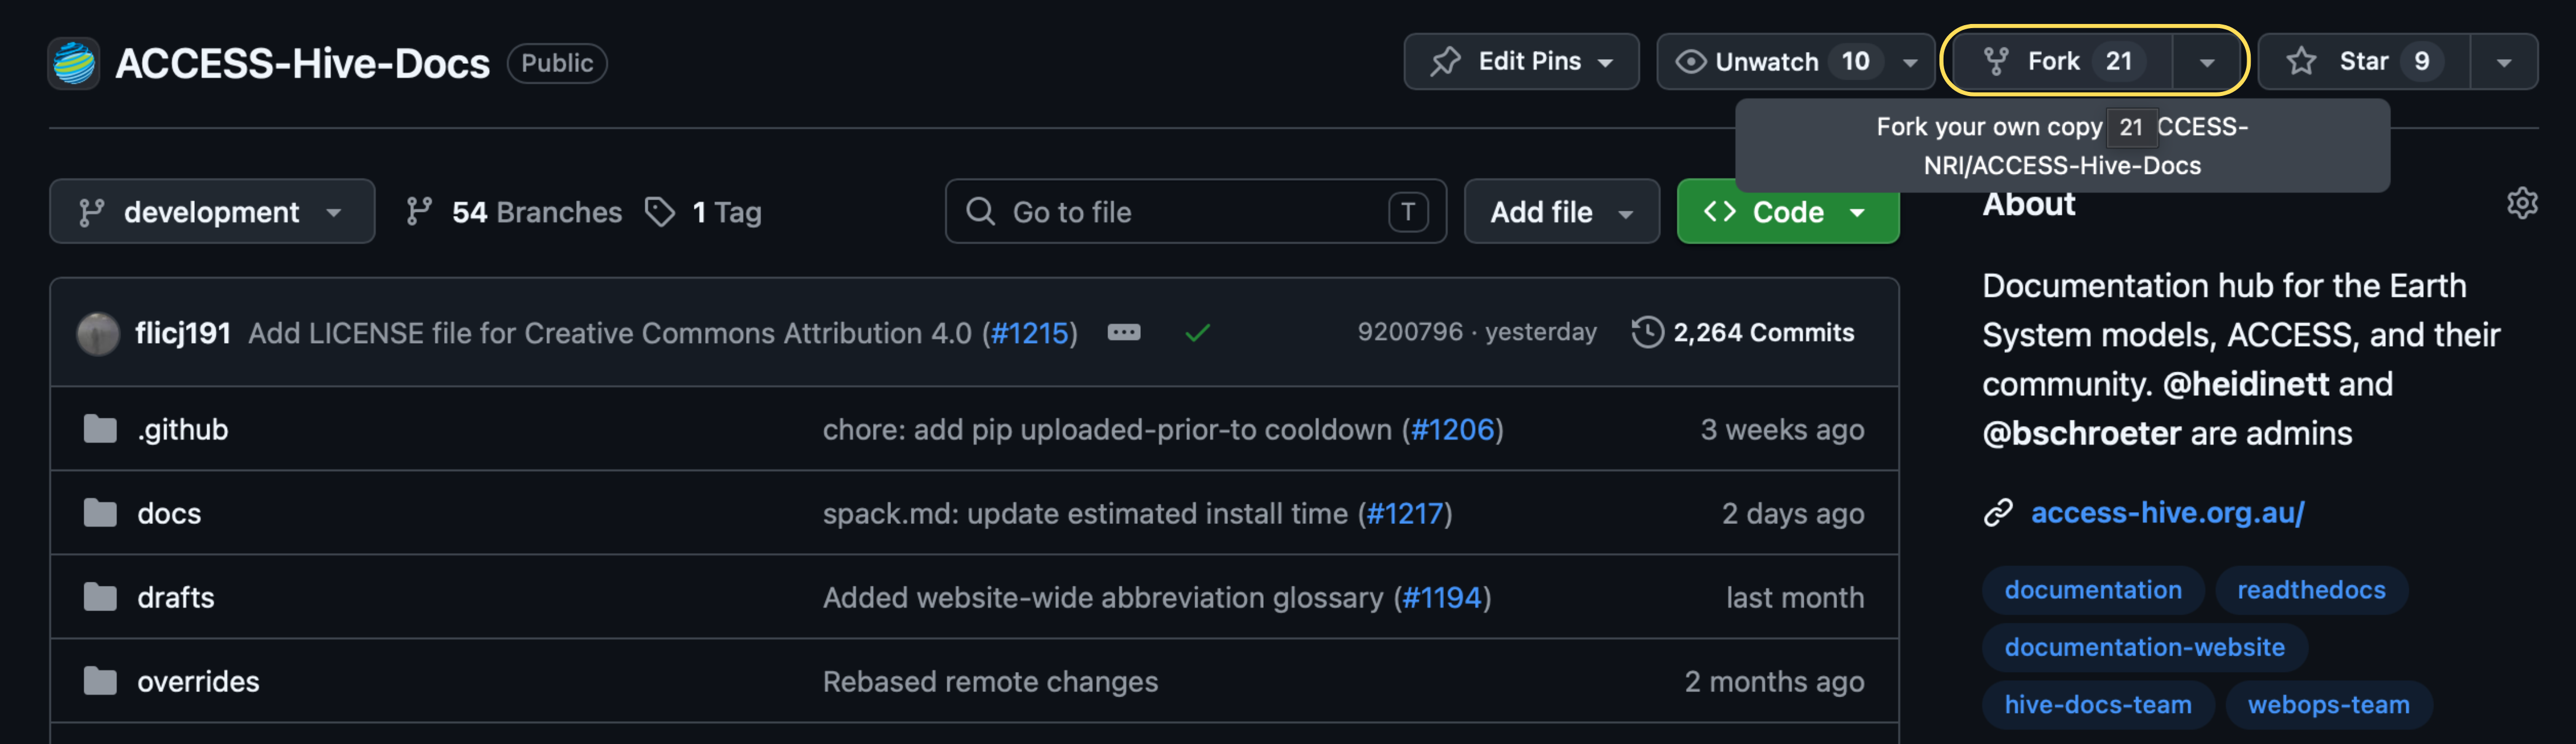
- Go to the ACCESS-Hive-Docs repository on GitHub.
- Click Fork in the top-right corner.
- Choose your GitHub account and repo name as the destination (we suggest to keep the original name to avoid confusions).
- Click Create fork.
This creates your own copy of the repository on GitHub.
Step 2: Clone the repository
Cloning a repository creates a local copy of the repository on your computer.
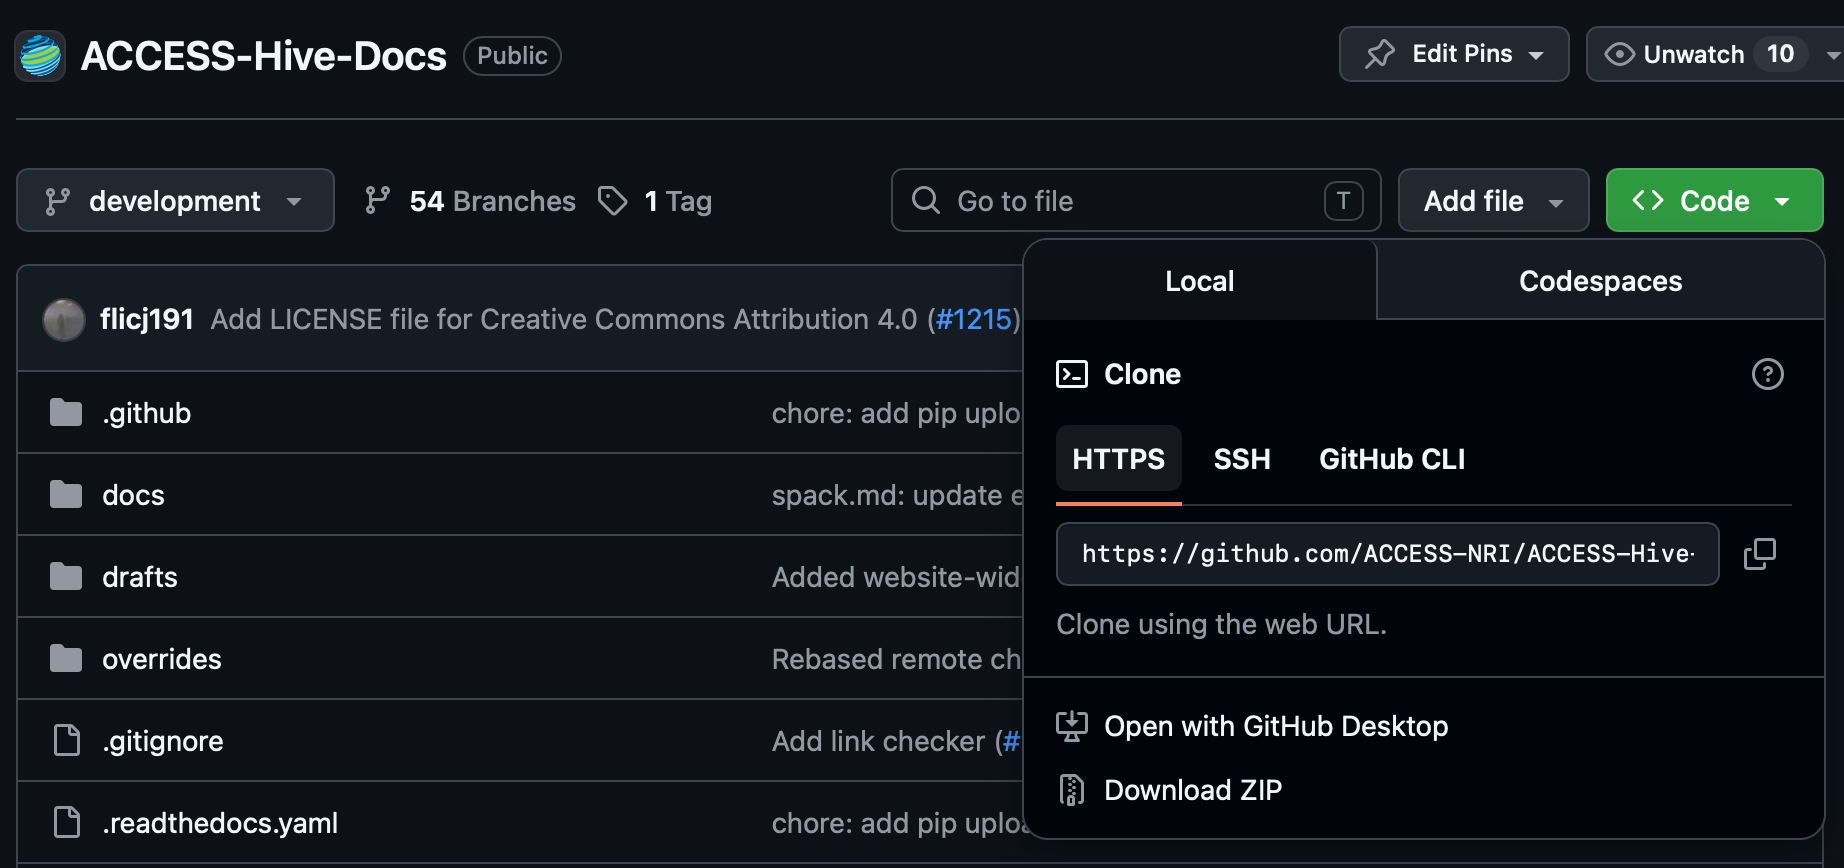
Then, if you have forked the repository, you can clone your fork by clicking the green Code button in the top-right corner of the repository page, copying the repository URL, and then running the following command:
git clone https://github.com/YOUR_USERNAME/ACCESS-Hive-Docs.git
If you are an ACCESS-NRI team member, you should clone the original ACCESS-Hive-Docs repository directly:
git clone https://github.com/ACCESS-NRI/ACCESS-Hive-Docs.git
Cloning with SSH
If you have already configured SSH keys, click the green Code button, select SSH, and copy the SSH URL. You can then clone the repository using:
git clone git@github.com:ACCESS-NRI/ACCESS-Hive-Docs.git
Once the repository has been cloned, navigate into the repository directory.
Step 3: Create a new branch
When you clone the repository, it should default to the development branch. This is the base branch for new work and the branch your pull request will eventually merge back into. Create a new branch for your changes:
git checkout -b your-branch-name
Creating a separate branch keeps your work isolated from the development branch while you make and review your changes. For more information, see Branching Workflows in Best Practices.
Step 4: Make your changes
Open the directory in your editor (e.g. VS Code), ensure you are working on your new branch (VS Code lists your current branch in the bottom left of the window) and make your edits. You can check which files have been modified with:
git status
Step 5: [OPTIONAL] Preview your changes locally
Info
Local previews can be really handy to see your changes rendered how they would look on the website, but they require you do install software onto your computer. If you'd prefer to avoid software installation, you can skip this step and preview your branch after you push your changes to the Hive Docs repository via a pull request (by following the remaining steps).
Execute the following command to download and install Material MkDocs and all related plugins:
python3 -m pip install -r requirements.txt
Warning
To run this command you need to have Python installed. If you don't have it installed, please download it.
Before submitting your changes, you can preview them locally using the command:
mkdocs serve
This will start a local documentation server. Open the URL shown in your terminal, usually:
http://127.0.0.1:8000
Step 6: Review your changes
Review your changes before committing:
git diff
This helps confirm that only the intended changes will be included.
Step 7: Commit your changes
Stage the files you changed:
git add path/to/file.md
Or stage all modified files:
git add .
Commit your changes with a short description:
git commit -m "my commit description"
Step 8: Push your branch to GitHub
Once, you have committed your changes, push your branch to GitHub. The first time you push a new branch, run:
git push --set-upstream origin your-branch-name
The --set-upstream option links your local branch to the branch on GitHub. After this you can any future commits on the same branch with:
git push
Step 9: Open a pull request
After pushing your branch to remote, create a pull request using the following steps:
- Go to the repository on GitHub (either the main Hive Docs repository for ACCESS-NRI GitHub org members or your fork of that repository for others).
- GitHub will usually display a message near the top of the window to create a pull request from your branch or fork.
- Click Compare & pull request.
- Add a title and detailed description explaining your changes.
- Click Create pull request.
Tip
Include a brief summary of what changed and why. If your changes relate to an existing issue, consider linking to it in the pull request description.
Step 10: Review the pull request preview
After you open a pull request, a preview version of the documentation is automatically generated. Once the preview has been built:
- Open the preview link which is added automatically at the bottom of the first comment of the pull request.
- Check your changes in the linked preview documentation site.
Note
The pull request preview shows how your changes will appear before they are added to the public website, making it a great way to catch formatting or rendering issues.
Best Practices
Creating issues
Creating clear and well-labelled issues helps contributors to quickly understand the type, purpose, and urgency of a task.
-
Use a clear and descriptive title that summarises the issue.
-
Include enough context for others to understand the problem.
-
Keep issues focused on a single topic where possible. Smaller, targeted issues are generally easier to discuss and resolve.
Branching Workflows
The Hive Docs repository currently uses two primary branches: main and development. main is the production-ready branch (what is visible on the public website), and development is the staging branch where latest changes are pushed and previewed.
Contributors should generally:
- Create a feature branch from
development. - Open pull requests with
developmentas the target.
The development branch is automatically merged into main daily. This reduces the risk of having breaking changes affect the live website.
Branch Naming
Using a descriptive branch name makes it easier to understand what the branch is for. We recommend using the following branch name structure:
name/issue-number/short-description
Example:
- bob/24/add-cosima-tutorial
Pull Requests
Well-documented pull requests help reviewers understand the intent of changes and reduces the turnaround time of the review.
When opening a PR:
- Provide a clear summary of the changes.
- Explain why the changes were made, not just what changed.
- Link related issues or discussions where relevant.
- Include screenshots or previews if applicable.
Smaller and focused PRs are generally preferred over very large changes, as they are easier to review, test and merge.
Before submitting a PR, contributors are encouraged to:
- Check formatting and links.
- Preview documentation changes on the PR previews generated just after creating a PR.
- Check GitHub CI is passing all checks.
Need help?
- For any questions, create a help request on the ACCESS-Hive Forum.
Further Reading
- For official GitHub documentation, see GitHub Docs.
- For a more detailed, beginner-friendly introduction to Git and GitHub, see Project Pythia - Getting Started with GitHub tutorial.